요즘 채용사이트에서 보면, 프런트엔드 자격요건에 typescript, react, vue, angular, nodejs가 빠지는 일이 없다.
그런데 나는 회사에서 오래된 코드를 사용하고 있기 때문에 ES6도 제대로 못해본 것이 사실이다.
언제까지 회사 핑계만 대면서 최신 트렌드를 따라가지 않을 수 없기에.. 많이 늦었지만 react 기본이라도 학습을 해보려고 한다.
그러기 위해서는 먼저 개발환경 세팅부터 해야지!
프로젝트 생성하기(타입 스크립트 사용버전)
1. 적당한 위치에 작업 폴더를 생성한 후 VSCode를 실행하여 해당 폴더를 연다.
2. 터미널을 열어서 아래 명령어 입력
npx create-react-app simple-react-board --template typescript

타입스크립트를 사용하지 않으려면
npx create-react-app simple-react-board
프로젝트가 생성될 때까지 기다리자.
찾아보면 npm create-react-app simple-react-board로 하면 된다고 하는데, 나는 Unknown command: "create-react-app" 에러가 발생한다. 어떻게 하는 건지 아시는 분은 댓글로 알려주세요.
프로젝트 생성이 완료되면 아래와 같은 구조로 파일들이 생길 것이다.

3. 생성된 프로젝트(simple-react-board)로 터미널 경로 이동 후 아래 명령어를 입력
npm start
4. 기다리면 브라우저가 열린다.
5. 불필요한 파일들 삭제
public/
favicon.ico, index.html, manifest.json, robots.txt만 남기고 삭제

src/
App.css, App.tsx, index.css, index.tsx, react-app-env.d.ts만 남기고 삭제
6. src/index.tsx 파일 수정
import ReactDOM from 'react-dom';
import './index.css';
import App from './App';

ReactDOM.render(
  <App />,
  document.getElementById('root')
);
7. src/App.tsx 수정
import './App.css';

function App() {
  return (
    <div className="App">
      Hello World!
    </div>
  );
}

export default App;
8. 변경사항 확인
리액트 프로젝트 생성은 끝!
이제 개발에 도움이 되는 세팅을 진행해보자.
먼저, typescript에 필요한 라이브러리를 추가로 설치한다.
나는 최신 버전을 사용해서 그런지 프로젝트를 생성하면서 이미 아래 라이브러리가 설치되어있다.
package.json을 확인한 후 없는 것만 추가로 설치하면 된다.
npm i react react-dom typescript
npm i @types/react @types/react-dom @types/node
그리고 tsconfig.json 파일을 열어서 'target'을 'es6'로 변경했다. 하는 김에 최신으로 해야지.
추가로 baseUrl도 추가하였다.
tsconfig.json 전체 코드
{
  "compilerOptions": {
    "target": "es6",
    "lib": [
      "dom",
      "dom.iterable",
      "esnext"
    ],
    "baseUrl": "./src",
    "allowJs": true,
    "skipLibCheck": true,
    "esModuleInterop": true,
    "allowSyntheticDefaultImports": true,
    "strict": true,
    "forceConsistentCasingInFileNames": true,
    "noFallthroughCasesInSwitch": true,
    "module": "esnext",
    "moduleResolution": "node",
    "resolveJsonModule": true,
    "isolatedModules": true,
    "noEmit": true,
    "jsx": "react-jsx"
  },
  "include": [
    "src"
  ]
}
ESLint와 Prettier도 설정한다.
ESLint는 자바스크립트 문법에서 에러를 표시해주는 도구이고, Prettier는 개발자들에게 일관적인 코딩 스타일을 유지할 수 있게 도와주는 툴이다.
ESLint 설정
1. VSCode 마켓플레이스 > 'eslint' 검색 후 설치

2. 프로젝트에서 ESLint 설치
npm i -D eslint eslint-plugin-prettier eslint-config-prettier
3. 프로젝트 root폴더에서 ESLint 시작
npx eslint --init
eslint init을 하게 되면 이것저것 질문이 많이 나오는데, 해석하면서 본인의 스타일대로 설정하면 된다.
나는 배운다고 생각하고 무조건 잡아주는 걸로 다 했다. (정답은 없다.)
그렇다고 무조건 엔터를 누르면 안 되고, 중간에 제대로 응답해야 하는 질문이 나오면 응답을 해야 한다.
예를 들면, Which framework does your project use? 라던지.. Does your project use TypeScript? 라던지..
혹시 나와 같은 대답을 하고 싶은 사람을 위해서 나의 대답을 남기겠다. (마음대로 했음.)

만약 위 질문 중 What format do you want your config file to be in? 에 나와 동일하게 대답을 했다면, .eslintrc.json파일이 생성되었을텐데, .eslintrc.json 확장자를 js로 바꿔주자.
뭐가 잘 안된다.
4. .eslintrc.js 파일 수정(extentds, plugins 부분은 본인에 맞게 수정해야 한다.)
module.exports = {
    root: true,
    env: {
        browser: true,
        es2021: true,
    },
    extends: [
        "plugin:@typescript-eslint/recommended",
        "google",
        // typescript 표준 규칙 모음
        "plugin:import/errors",
        "plugin:import/warnings",
        "plugin:import/typescript",
        // import 관련 규칙 모음
        "plugin:prettier/recommended",
        "prettier/@typescript-eslint",
        "prettier/react",
    ],
    parser: "@typescript-eslint/parser",
    parserOptions: {
        ecmaVersion: "latest",
        sourceType: "module",
        project: ["./tsconfig.json"],
    },
    plugins: ["react", "@typescript-eslint"],
    rules: {
        "linebreak-style": 0,
        "import/prefer-default-export": 0,
        "import/extensions": 0,
        "no-use-before-define": 0,
        "import/no-unresolved": 0,
        "react/react-in-jsx-scope": 0,
        "import/no-extraneous-dependencies": 0,
        "no-shadow": 0,
        "react/prop-types": 0,
        "react/jsx-filename-extension": [2, { extensions: [".js", ".jsx", ".ts", ".tsx"] }],
        "jsx-a11y/no-noninteractive-element-interactions": 0,
        "@typescript-eslint/explicit-module-boundary-types": 0,
    },
    settings: {
        "import/resolver": {
            node: {
                extensions: [".js", ".jsx", ".ts", ".tsx"],
            },
        },
    },
};
Prettier 설정
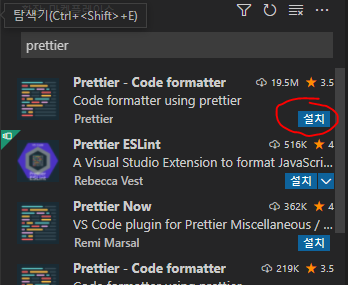
1. VSCode 마켓플레이스 > 'prettier' 검색 후 설치
2. 프로젝트에서 Prettier 설치
npm install -D prettier
3. 프로젝트 root폴더에 .prettierrc.js 파일 생성 후 아래 코드 입력
module.exports = {
    endOfLine: "lf",
    tabWidth: 4,
    semi: true,
    singleQuote: false,
    trailingComma: "all",
    printWidth: 120,
};
마지막으로 settings.json 설정
1. VSCode 파일 > 기본 설정 > 설정 혹은 Ctrl + ,
2. 우측 상단에 설정 열기(파일로 여는 것)

3. settings.json 파일에 아래 코드를 추가한다.
"editor.defaultFormatter": "esbenp.prettier-vscode",
"[typescriptreact]": {
    "editor.defaultFormatter": "esbenp.prettier-vscode"
},
"[typescript]": {
    "editor.defaultFormatter": "esbenp.prettier-vscode"
},
"editor.formatOnSave": true
이렇게 리액트 프로젝트 생성부터 좋은 코드 만들기 세팅이 모두 끝났다.
시작이 반이라고 했으니, 절반은 끝났다고 봐야 되나?
아무튼 성공적인 게시판 만들기 경험이 되었으면 좋겠다.
'개발 > react' 카테고리의 다른 글
| [VSCode] React + nodejs + mySQL로 게시판 만들기 6편 - 게시물 쓰기, 수정, 삭제(1) (3) | 2022.03.23 |
|---|---|
| [VSCode] React + nodejs + mySQL로 게시판 만들기 5편 - 테이블 생성, 게시판 목록 조회 (3) | 2022.03.22 |
| [VSCode] React + nodejs + mySQL로 게시판 만들기 4편 - 서버 환경 구성 (13) | 2022.03.21 |
| [VSCode] React + nodejs + mySQL로 게시판 만들기 3편 - MySQL 설치 (0) | 2022.03.21 |
| [VSCode] React + nodejs + mySQL로 게시판 만들기 2편 - 게시판 UI 만들기 (2) | 2022.03.18 |